Showing posts with label melissa. Show all posts

8.02.2013

Exposure Made Easy PART 3: ISO

by melissa

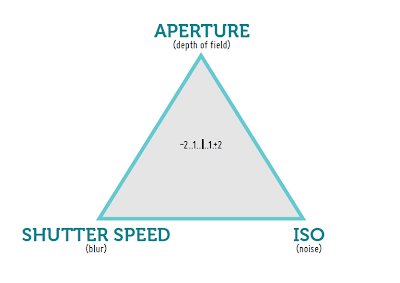
In the first segment of the DSLR Exposure Series, I briefly discussed the exposure triangle, and one of the three settings in the Exposure Triangle, aperture. In Part 2 we covered shutter speed, and now in Part 3 we're finally moving onto the mysterious remaining setting: ISO.
I say mysterious because when Jon and I first heard the term ISO (and for a year or two later), it sounded familiar, but we had absolutely no idea what it was. When the time came for us to bite the bullet and learn how to shoot on manual, we of course turned to the trusty (yet not always trustworthy) Wikipedia. And believe you me, you don't want to go there for ISO. It looks like a calculus class on steroids, and it sailed right over our heads in 10 seconds flat. It's math, it's logarithms, and if you're like me, it's torture. Very complicated, very overwhelming, and definitely not our thing.

So we read elsewhere and took a more 'average person' approach to ISO, leading us to an 'average person' understanding of it.


What is ISO?
Once we finally figured it out (which took some time...), the way I remembered it was to think of ISO as fake light—a last resort to lighten the shot when my aperture and shutter speed were maxed out.

For the more engineer-minded of you, here's the watered down version that we can *almost* wrap our brains around. In film, ISO is the indication of how sensitive the film is to light. If we understand this correctly, in digital photography, ISO digitally simulates sensitivity of the image sensor to light. Remember, film changes in sensitivity to light, not the camera—but since there is no film in the digital world, the camera has to mimic that sensitivity without the film (since we know it's not the memory card affecting it :)

If you can take yourself back to the pre-digital version of you in the 90's, looking for film for your sweet 110mm camera (at least that's what I had, the flat-ish, plastic rectangle that came in all colors of dreamy neon, but feel free to insert your own 90's camera model from your memory here), you may have a flashback of some film speed numbers, like 100 for outdoors, 400 for sports, 800 for indoors...or something like that. Those are basically the equivalent of ISO numbers now.

The same basic number principles apply here as in film photography—higher ISO numbers mean the sensor is "more sensitive" to light, while lower ISO numbers mean the sensor will be "less sensitive" to light. Higher ISO settings are preferred in darker situations to get faster shutter speeds (i.e., indoors, dimly-lit receptions, outside at dusk/night)—however, the cost is noisier shots. Noise is the digital version of film grain, which is basically specks that take away from the quality of the image.

Since a lower ISO will create a clearer shot, a low ISO is ideal more often than not. However, a grainy shot is better than no shot, so if you’re choosing between a high ISO or no picture at all, crank the ISO and go for it.

(please keep in mind I use high ISOs in desperation when dealing with bad lighting, so in order to show grainy examples, I had to create bad lighting, and take less-than-ideal photos. All in the name of information sharing :)


Here's your takeaway.

  1. ISO is like a simulated lightening of your shot. (not to be confused with simulated lightning, which would hurt)
    Use it as a last resort to lighten your exposure when you've maxed out your aperture and shutter speed.
  2. Higher ISOs will make lighter shots and a grainier/noisier shot, which also decreases image and color quality.
  3. Stay on ISO 100 whenever possible, but know when and how much to bump up your ISO settings.
    For example, you could memorize some basic ISO settings, like...Sunny: ISO 100, Shade: ISO 400, Indoors: ISO 400, Indoors at night: ISO 800. Those are just basic guidelines that could obviously fluctuate depending on how sunny, shady, or dim your lighting is. But having the numbers in your head will allow you to think less and shoot more in each lighting situation.
  4. A noisy shot is better than no shot!
    ISO is there for a reason, so when you're hurting for light, don't hesitate to crank that ISO! And I have to put a plug in for modern technology...we've found that newer models are seriously killing it with ISO! There are sometimes when we're fighting to find any grain in our photos shot with ISO 6400—that's pretty phenomenal.
    Shots I would have missed out on last November if I hadn't shot up my ISO! Left: 50mm, f/1.8, 1/200, ISO:6400. Middle: 50mm, f/1.8, 1/400, ISO:6400. Right: 50mm, f/1.8, 1/500, ISO:6400.

  5.  If you've maxed out all three exposure settings and you still can't get enough light...
    ...you either need a better lens (you can read up on my lens post for ideas), or you need to find more light. (get out of the shade, turn on more lights, add more lights/lamps into your home, or you go the flash route and learn to use it without looking like you used it) Or wait until the sun comes up :)

Some little FYI nuggets about noise/grain...
(you should be able to click on the images below to see them larger and see the noise better if you want to) 

 I think it's definitely better to have ISO noise than shutter-speed blur, so don't feel bad if you have to up your ISO to lose the blur. Do it.
50mm, f/1.4, 0.4s, ISO:100

Long exposure (slow shutter speed) and a tripod will allow more light in without a high ISO, but that's typically best for still-life or capturing time-lapses (not people).
50mm, f/22, 4.0s, ISO:6400.

Noise typically shows up most in the shadows in your shot, and in the portion of your image that is not in focus, but even then it probably won't show up much until you're using a very high ISO in poor light.
haha...I just realized I was talking about "noise" and pointing to different keys on a piano...all the sudden this photo looks like a strange piano lesson illustration when taken out of context. Whoops! 50mm, f/1.4, 1/500s, ISO:1600

Probably no one will even notice the noise except you or a professional photographer.


50mm, f/1.4, 1/80s, ISO:1600
Using a high ISO in a dark place will mess up the colors of your image. Check out how different the color is in this shot!! And when color gets messed up like that in a JPG file, it's pretty much impossible to post-edit it in a way that will make it look the color it should have.
50mm, f/1.4, 1/500s, ISO:1600

BUT...noisy shots can look pretty awesome in black and white when the colors of your image are messed up :) It's a good plan B. It makes them feel a little old and newspaper-y, and what's not to love about that?
50mm, f/1.8, 1/400s, ISO:6400.

50mm, f/1.4, 1/200s, ISO:400.


Photo challenge of the week!

Gear yourself up to go full-manual mode! You can try one day a week, or even 10 minutes a week, but challenge yourself to start braving the learning curve and give it a shot! (More on how to make this process easier coming up next :)

Good luck as always! Hopefully it was clearer than mud and definitely less painful *hopefully* than looking it up on Wikipedia :)

Have a fabulous weekend...rock on, party people.


Pin It

6.07.2013

Exposure Made Easy PART 2: Shutter Speed

by melissa

In the first segment of the DSLR Exposure Series, I briefly discussed the exposure triangle, and one of the three settings in the Exposure Triangle, aperture. Today we're moving onto a second setting in the exposure triangle: shutter speed.

When you're dying for a crystal clear shot and all you're getting is blurred eyes and streaks of arms and legs moving as your two-year-old runs away from you, it can be very frustrating—especially if you're shooting in auto and you have no idea why your camera is blurring every. single. shot. Not cool. Most likely you want to avoid motion blur, and understanding shutter speed is the first step to stopping it.

Shutter speed is a refreshing setting to learn about (at least it was for me) because it's pretty self-explanatory, and we like self-explanatory around here. No big tricks to throw you for a loop like aperture does. Just speed (or lack of it). You can totally do this. You've got it in the bag.

What is shutter speed?
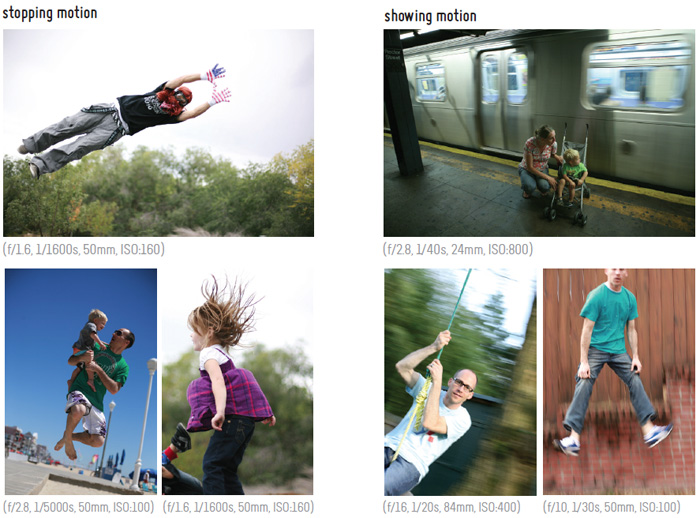
Shutter speed is the length of time the shutter remains open for a shot, or how long the digital sensor is exposed to light. Shutter speed controls the ability to capture motion blur or stop action in a photo. It means your shutter is open for a longer amount of time or shorter amount of time, depending on where you set it. And that setting affects two things: light and motion blur. The faster the shutter speed, the darker the photo and crisper the capture, freezing motion in time for your shot. The slower the shutter speed, the lighter the photo, and more blurry the capture, allowing more time to pass and more movement to be recorded in the shot. Easy breezy.


Let me specify that motion blur is different from the bokeh we talked about in the Aperture post, and it's different from just missing the focus and not nailing the shot. Motion blur and out of focus are two different things. Motion blur happens because your subject (or anything else in your shot) moved, or you moved, and you were shooting on a slow shutter speed.

Let's have our 2 minute tech-y session and get it over with. Shutter speed is measured in seconds and fractions of a second. For example, 1/500 means that the shutter will be open for one five-hundredths of a second. Like I mentioned above, fast shutter speeds (like 1/1000) are used when trying to freeze action but decrease the amount of light entering the camera. Slow shutter speeds, like 2 seconds, are often used for night shots or when trying to show motion.

Speeding up your shutter will ALWAYS mean a darker photo…UNLESS you compensate for it somehow with other settings (sound familiar? From the aperture post? Remember, each setting in your Exposure Triangle equally affects how light/dark your photos will be). If it is bright where the picture will be taken, but you want to show motion, you can make the aperture smaller or use a lower ISO to compensate for the extra light the slower shutter speed is letting in.

In most cases with every day shooting, though, you should probably be using shutter speeds of 1/80th of a second or faster, because anything slower than that is very difficult to use without getting camera shake and blurring the heck out of your shot.


Left: f/1.4, 1/5000s, 50mm, ISO:100. Right: f/10, 1/60s, 50mm, ISO:100


How do I avoid motion blur?
Speeding up your shutter is the obvious answer, but when you do that, you'll find that your shots start losing light in a hurry, especially if you're shooting in dark shade, in earlier or later hours in the day when light is low, or indoors. A black photo, crisp or not, isn't doing anyone any favors. There are four quick steps for avoiding motion blur when your light is low. If you've tried the first step and your shot is dark or still blurry, move on to then next one.
  1. Make sure you're on your LARGEST aperture. This will let in the most amount of light.
  2. Max out your shutter speed by using as low of a shutter speed as possible without blurring.
  3. Use your last resort and adjust to a higher ISO. (more on this to come in Part 3 of this series)
  4. If you've tried all of the above, and your shots are still blurry, you need a new lens with a bigger aperture (you can learn more about that in my lenses post).

Left: f/9, 1/60s, 50mm, ISO:100. Right: f/1.4, 1/2500s, 50mm, ISO:100


Is motion blur ever a good thing?

Yes. It's one of those things where if you understand the rules, you can break them on purpose and do something awesome. But that will probably be rare unless it's something you're crazy about experimenting with. There are times when you want to show blur, indicating movement, speed, or a time lapse, and if you ever decide to get a little crazy with shutter speeds and venture into long exposures by using incredibly slow shutter speeds, it can be pretty fun (I'll probably do a fun long exposure post in the future). When you're blurring on purpose, slow shutter speeds are on your side. Otherwise, try to nail your settings and you'll be able to leave your blurry days behind.


Top: f/1.4, 1/3200s, 50mm, ISO:100. Bottom: f/10, 1/80s, 50mm, ISO:100


Photo challenge of the week!
Switch to timing priority/shutter speed priority (Tv for Canon, S for Nikon). Play around with different shutter speeds to see how it changes your photos. This is especially fun if you try slower speeds with people or things that are moving to show motion, then switch to a faster speed to stop them in time. Get a feel for what shutter speed works best in broad daylight, in the shade, indoors, and commit them to memory if you're feeling ambitious.

Good luck! Let me know how it goes, and be sure to share your questions, comments, and experiences with us!

And I had to leave you with this outtake photo to kick off the weekend, because it cracks me up. Nailed the jump, killed it with the shut eyes. But he's so focused and trying so hard it just can't go unshared! Have a great weekend! :)
Pin It

5.17.2013

Exposure Made Easy PART 1: Aperture

by melissa

Understanding exposure is the beginning of understanding your camera, which comes in pretty handy in getting the shots you want. First of all, let's establish something.

Auto does a pretty good job. 

Auto means you're letting your camera guess the exposure you want for each shot. And for the most part, it's a pretty remarkable feature. Your camera is really smart. And if it's easier for you, and more fun for you to stress less about settings, then roll with it!

If you find yourself getting stuck though, or you're constantly wondering "how do I get my pictures to look like that?" when looking at other photography, then there's something you should know: you are smarter than your camera.

Pretty awesome, right? That means if you understand what is affecting your exposure, you can decide exactly how you want to expose every shot. It was a big day for us when we discovered that. It was so nice to be able to CONTROL our own exposure and actually get our shots to turn out the way we wanted them to. Hopefully I can give some tips that will make your discovery a lot quicker than our teach-ourselves, hit-and-miss, read-lots-of-books-we-didn’t-understand-yet, and search-every-online-forum-and-tutorial method. :)

So let's get to it.

Exposure is light recorded into your camera. Easy enough. There are three key exposure settings that determine how light is recorded into your camera, so this Exposure Series will be done in three parts: aperture, shutter speed, and ISO. These make up "The Exposure Triangle." I know it sounds like a lot of big words and there will be lots of numbers thrown around...but stay with me! Getting this will be huge! Each setting in your Exposure Triangle equally affects your exposure, or how light/dark your photo will be.

Today we're tackling aperture.
(see part 2 on shutter speed here)
What is aperture?
Aperture is the size of the opening in the lens when a picture is taken. It opens to let in more light and closes to let in less light. It's like a big eyeball that squints when it's too bright and dilates when it's dark, or at least it should when exposing correctly :) The larger the hole or aperture (also called an f-stop), the more light will hit your sensor. The smaller the hole or aperture (f-stop) the less light will hit your sensor.

Here's a curveball for you, though. It would make sense that a larger number should mean a larger opening, but no such luck. The f-numbers are fractions, so actually, the larger the f-number, the smaller your aperture becomes. The lower the f-number, the bigger your aperture becomes and the more light comes in through the lens. How's that for inconvenient? Check out the chart below to see how much the opening of the lens changes with each f-stop. It's crazy!! I would never have thought it would be that big of a difference. (The bolded f-numbers are those that are most common. If your camera won't let you go down as low as f/1.4, f/2, f/2.8, your camera's not messed up, it's just as low as your lens will go. You can read up on my lens post for more info.)


Aperture also controls depth of field and affects the lighting of your exposure. Depth of what?! No worries, that's where we're headed next. You can't talk aperture without talking depth of field, folks.

What is depth of field?
Depth of field is the amount of your subject that is in focus. An image with a very small depth of field (created with large, *and usually more expensive* apertures) have a lot of dreamy, melted foreground/background with only one segment of the image in focus—see image on the left—while an image with a very large depth of field (created with small apertures) would have everything in focus—see image on the right. The blur (not to be confused with motion blur) created when things are out of focus because of a large aperture/small depth of field is also known as bokeh.

Self-indulging tangent...I may daydream about bokeh, and you may remember my confession here of loving large apertures to a fault for that very reason. It's a style choice and completely a personal opinion, but I like to think of it more as better story telling—allowing the part to be seen that you want to be seen, and forgetting the rest that dilutes the story. Plus...it's beautiful. Just sayin.' :) My lens post has more info on lenses and tips on which can help you get the smallest depth of field and best bokeh. 

Mmmmm, yummy bokeh.


In English, please...
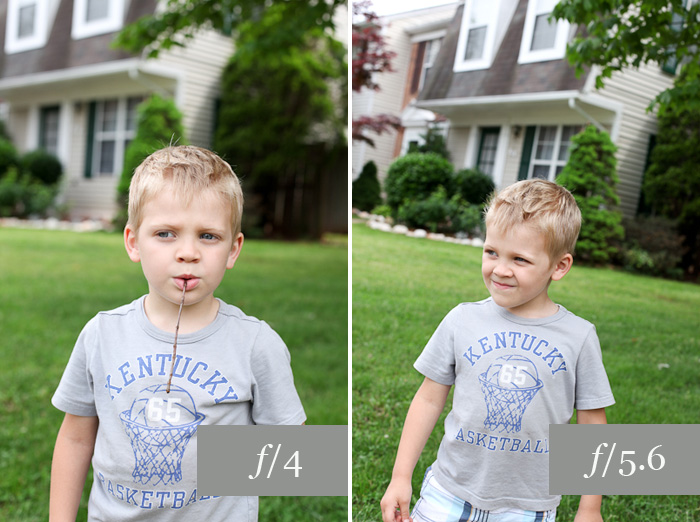
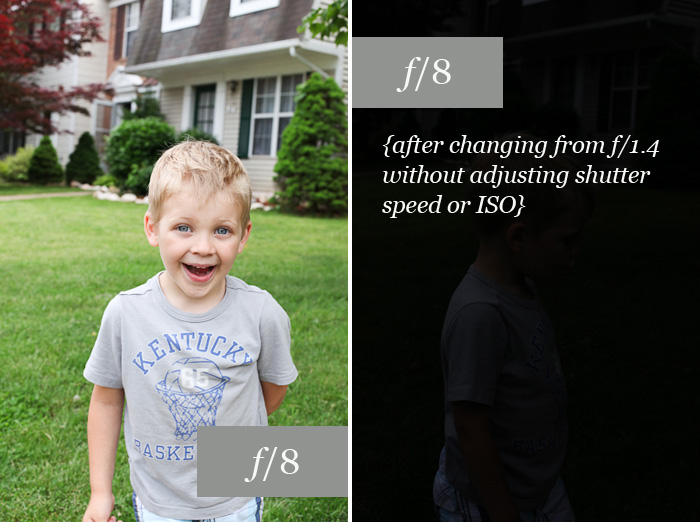
Here is a series of photos taken from the same spot with different apertures. You can see as the aperture gets smaller (and f-stop # gets larger), more of the background comes into focus.


What you CAN'T see, is that with each decreased aperture size, I had to compensate the loss of light by boosting my other exposure settings (shutter speed in this case...that post comes next).

Making your aperture smaller and bringing more into focus will ALWAYS mean a darker photo...UNLESS you compensate for it somehow. See the last image? The black one? Yep. That was to show you, in all its glory, what happened when I went from f/1.4 to f/8 without adjusting my shutter speed or ISO. If you're shooting on Aperture Priority (Av for Canon, A for Nikon), your camera should be making those adjustments for you. In manual mode, it's up to you. But we'll cover that in parts 2 and 3 of the series, so don't panic. Baby steps. Let's rock photography one mind-blowing technique at a time.

Remember these 3 things.
  1. Aperture is the opening of your lens.
  2. The smaller the number the larger the opening.
  3. Larger openings let in more light and have a smaller area of focus (more blur/bokeh/awesomeness).
Photo challenge of the week!
Switch to your aperture priority setting and stay there this week (Av for Canon, A for Nikon). Mess around with aperture sizes and see how it affects your shots. Get the hang of f-stops and a feel for how much will be in focus for each one (try comparing your shots with f/2.8, f/4, f/5.6, f/8, f/11).

Good luck! And let me know if you have any questions!
Pin It

4.22.2013

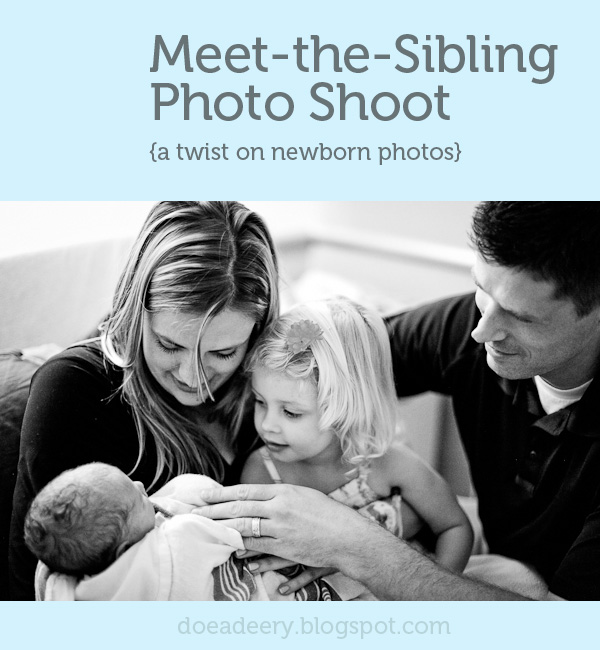
A Twist on Newborn Photos: Meet-the-Sibling Photos

by melissa 

When our photography business was in full swing, Jon and I decided early on to not have newborn sessions as part of our business. After trying our hand at them a couple times with some of our friends' newbies, we quickly realized it wasn't our thing. We're the first to say that those who do professional newborn photos are a serious force to be reckoned with, but feeling we would thrive better in a focused niche, we decided this niche wasn't ours.

Pin It

4.03.2013

The Crop Factor: One Extra Tip Before You Buy a Lens

by melissa

Here's a photography side note for the day, one I hinted at in my lenses post.

Maybe you've been eying the 50mm lens, because you heard it's the "must have" lens, the closest to being what the natural eye sees, the versatile, do-it-all, can't-go-wrong, nifty fifty. Maybe I'm the one saying all those things :) But before you go jumping on the 50mm train (the very one I suggested in my last post), you might want to know that chances are incredibly high that there's a different lens that you should be getting instead of the 50mm. One that will better do the job for your camera.

Here's why.

(And don't worry, you'll definitely know that lens to get by the end of the post :)

Most digital cameras have cropped sensors instead of full-frame sensors. Having a cropped sensor means that the photo your camera will take with any given lens will be a cropped version of the photo a full-frame sensor camera would take with that same lens. Think of it as being zoomed in. That means any lens you put on your cropped-sensor camera is acting as a cropped version of its actual focal length (mm number), meaning it won't fit as much in the photo as it does at its full capacity on a full-frame sensor. I think this is most important for a fixed/prime lens, since you don't have the option to zoom in and out with the camera to make up for the loss in the crop.

So about that beloved prime 50mm lens...putting a 50mm on a cropped sensor is like putting a mat board over the outer edge of your photo and cutting it off. Which means a 50mm lens on your camera would not be acting like a 50mm lens. It would be acting more like an 85mm—or like a 50mm with a magnifying glass over it.

You can see above how each crop factor (1.3x, 1.5x, or 1.6x) crops in a significant amount from the full-frame photo. This would be the difference between the exact same photo taken at the exact same spot with the exact same lens, but with four different camera sensors.

In other words, you have to have a full-frame sensor to get the true size out of your lens. That said, you don't have to have a full-frame sensor to get awesome photos. The crop doesn’t alter image quality, because you can still take amazing photos with cropped sensors, and they are actually more common than full-frame sensors. But for taking portraits of people, especially when you don't have the space (or time—those kids are lightning fast!) to back away from your subject to get everything you want in your shot, the crop can make quite a difference in what you're fitting in your frame. The key here is to be aware of the crop, and then buy your lenses accordingly.

What crop factor does your DSLR have? (last I checked...)
  • 1.3x: Canon EOS 1D, 1D Mk11
  • 1.5x: Nikon D40, D50, D70s, D80, D90, D200, D3000, D5000, D2XD2Hs Minolta 7D, Fuji S3 Pro Pentax, K100D, K110D, K10D
  • 1.6x: Canon EOS Rebels, 7D, 20D, 30D, 40D, 300D, 400D
  • 2.0x: Olympus E-400, E-500, E-300, E-1

Knowing that you have a cropped sensor can allow you to compensate for the crop when you go to buy a lens, and we've created a lens conversions chart to help you do just that. So if you've read rave reviews about a certain lens that you've now got your eye on, make sure the reviews are particular to your camera's sensor size—and if they're not, check out our chart below to see which lens you should buy to get the right crop that you are expecting from your next lens. My guess is that you're going to walk away wanting a 35mm. What do you think?


Challenge of the week:
Find out if your camera has a cropped sensor. You can do this. Figure out your model. Then google it. Or check your manual. If you have a cropped sensor, now you know, and you're one step ahead the next time you're on the market for a new lens. Then you can start researching a new lens focal length that better suits your sensor (or just use the chart above).

Pin It

3.08.2013

Lenses: What You Want to Know

by melissa


I was originally dead set on making my next post on exposure, since I feel like it’s the most primary thing to learn about using your camera. But as your comments came rolling in from the indoor photos post, there were so many questions on lenses that I had to go there first. I remembered that before we understood exposure very well (or at all for that matter), we had a lovely lens. A lovely lens that made learning exposure a very rewarding thing. And so it seems fair to hope that someone else reading may get the chance to learn on a lovely lens also, like we did.

Warning...This is a lot of information.
Warning 2...I’m not a technology genius.
 

Pin It

2.08.2013

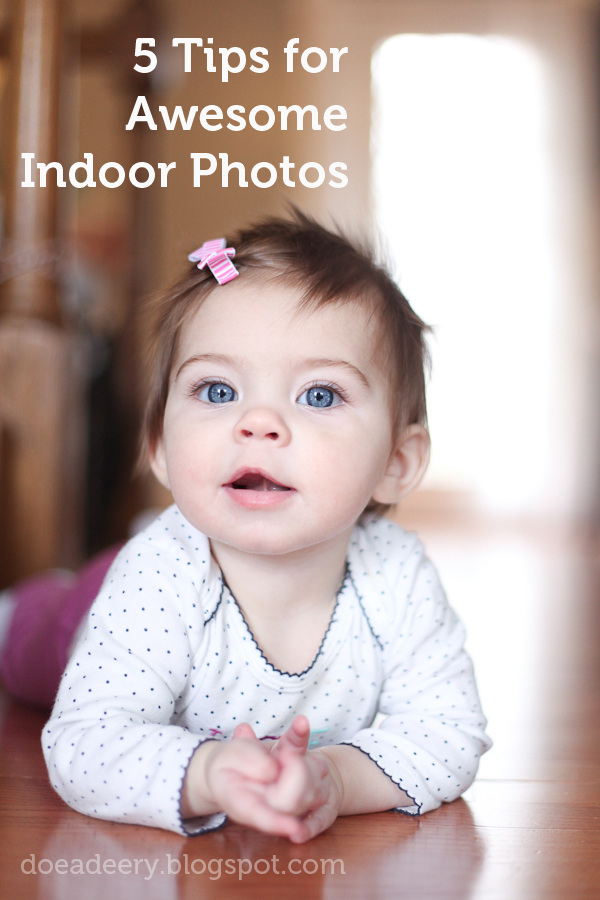
5 Tips for Awesome Indoor Photos

by melissa


Five years ago, my husband Jon and I were on a slow, diligent, 6-month hunt for the perfect DSLR, even though we hardly knew what qualified a DSLR to be perfect. Our first baby would be joining our family in the fall, and we wanted to be able to document everything about him—and document it well. We're both visual people with a pinch of creativity, and we were enamored with the thought of having awesome pictures. We'd maxed out our point-and-shoot, we were constantly drooling over the gorgeous photos of professionals, and we had so determined to learn how to take them ourselves, having no idea how big the learning curve would be. So with high hopes, we finally made a decision and took the plunge. Despite my hesitation to move on from the convenience of a pocket camera, Jon knew we would love it, and I was surprised how quickly I realized he was right. (And luckily phones have now fulfilled the need for a pocket camera :) We saw a huge difference from our point-and-shoot when taking photos outside, but the hurdle we hadn't even thought of was taking good photos inside the new place we had just moved into—a cozy little basement apartment.

Not only was our baby boy on his way, I was also about to quit my full-time job to stay at home all day, and fall and winter were looming just around the corner; meaning we were about to spend a LOT of time indoors. A very low-lit, nearly-sunlightless indoors at that. And this was the infamous winter of Snowmaggedon and Snowpocalypse in DC, which meant many snow days cooped up in our little cave with the new babe (yes, the snow totally covered our little basement windows).

For months we felt our pictures inside weren't quite right and didn't turn out the way we wanted (by far). So we devoured photography books, endless professional blogs, and online lessons to un-stump ourselves, and it was like magic when we finally found out how to fix them. The basement apartment was hardly ideal for wannabe budding photographers, but thanks to that little apartment, we got a crash course in low lighting and indoor lighting that made the biggest difference ever.

From our own cabin fever experience, here are the most important things we learned about taking awesome photos inside (that we actually loved).

1. Adjust your white balance

If I could tell everyone just one thing about indoor photography, this would be it. White balance. It will change your life (it totally changed ours). We lived through months of orange basement photos and random blue photos thanks to "auto white balance," and I'm here to tell you there's a cure! Little did we know it would be so easy. To simplify WB, just know that it is the coloring of the light. Different light sources come with different colors or temperatures. Our eyes are awesome and can adjust to the different hue of light each light source provides, but digital cameras can't do that on their own. You want to adjust white balance to get the colors in your images as accurate as possible. For example, the coloring of shade is much cooler than sunlight, but light bulbs inside the house are much warmer than sunlight. Because of the change of coloring, you need to adjust your WB to compensate. Auto white balance (AWB) does an okay job, especially outside with the sun, where your camera can guess coloring pretty well. But low light and mixed indoor lighting throws it off, and you may have found you'd like a little more (or a LOT more) control to avoid those bluish or orangey-reddish pics you're getting (like what we got for months!!).  Adjusting your own WB will make the most obvious difference indoors at night, but it's always better than auto. There are almost always presets on a DSLR, which are displayed as icons you can choose from to match your lighting:


For clarification, Tungsten is your basic yellowish household light bulb. Fluorescent lights make you feel like you're walking through Target (think bright neon-like white). Everything else is pretty self explanatory. So for cooler light (cloudy day, shade, indoors in the day without lights on) you’ll tell the camera to warm things up, and in warm light (indoor lights/tungsten) you’ll tell it to cool down. Or just pick the WB icon that matches your light :)


2. Lose the flash

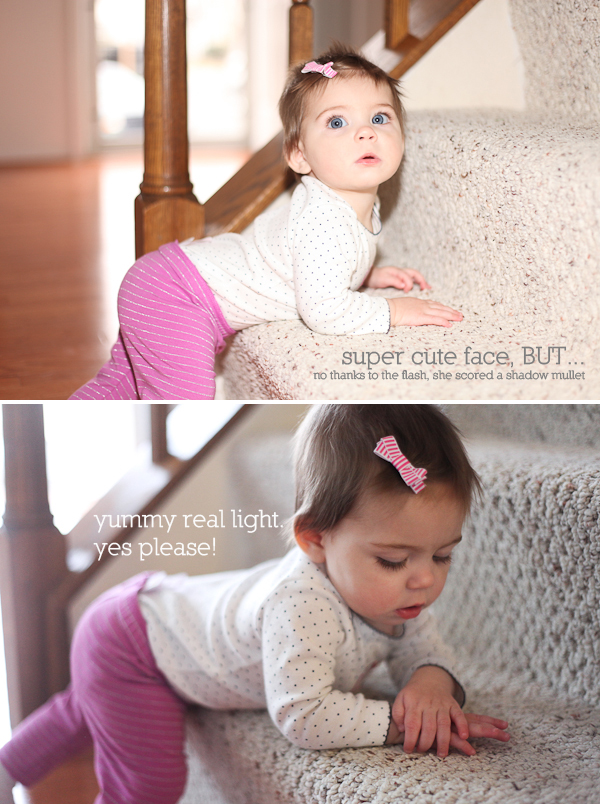
I have to confess...with the exception of big fancy weddings we shot, I (we) have never used a flash. Even with our point and shoot. Granted we've probably ruined a lot of shots that way, and when we finally had to suck it up and learn how to use our external flashes for receptions, we hit a learning curve the size of China. And I'll admit, there is a time and a place for flash. Large events in the dark being a good example. But (I could totally be going out on a social limb here) I'm a believer that inside our house we can all take great photos without it. We can also take a lot of not-so-great photos without it, but that's what the delete button is for :) And my guess is that even then, you will not regret having ditched your flash. Our goal with photos is to make them authentic, and flash will sadly take your moment and flatten all the depth right out of it. It removes soft shadows that show definition and replaces it with harsh shadows that are super distracting. Work with the real light you have and learn everything you can about your camera so you can adjust it to make your shot light enough without flash (look for more posts on the best ways to do that in the future).


3. Use your biggest aperture

Another confession (all the sudden it feels like I have a lot of things to confess)...I am addicted to large apertures. Huge, open, suck-in-every-speck-of-light apertures. A depth of field that turns everything into a watery blur (except the tiny point I focused on) makes me melt. This is to a fault, and I stick to it even against Jon's better judgment in family sessions or group shots. I seriously can't help myself. Good thing he's my other half on a shoot so he can be getting the people I've blurred away! But I digress. Aperture. This is hard for me to even mention without going into more detail (so it's a good thing I got to go into all sorts of detail here), but for now, know that your aperture is the size of the opening on your lens. The bigger the opening of your lens, the more light you will let in, and the more background you will blur out. Both of these things are the best news ever for indoor shots. You need light, and you want the busy background to melt away. Try switching to Aperture Priority setting ("Av" for Canon and "A" for Nikon) and get your aperture to the smallest number possible (they're fractions, the smaller the number, the larger the opening). That's a good start. (If you're ready to up your aperture game, head over to my Exposure Made Easy Part I: Aperture to learn more, or check out Lenses: What You Want to Know to find out which lenses will get you the biggest apertures for the best price.)

Bonus tip...avoid doing a "photoshoot" of your 4-year-old lasting longer than 5 minutes, especially if you are telling him exactly where to sit and which way to look, like I did for this post. He will very likely be unimpressed and bugged like mine above :)

4. Clean up the clutter

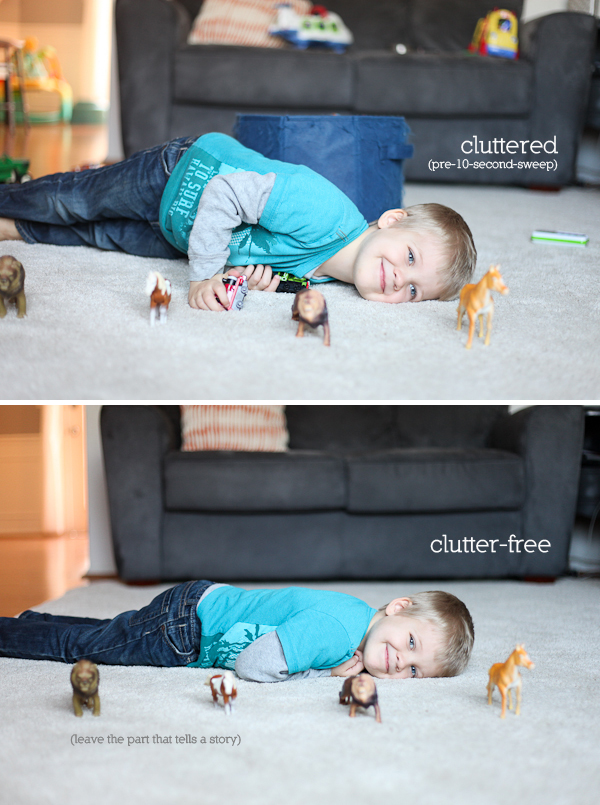
As a family of five, we've always got some form of a tornado running through our house, so a constant mess is inevitable. But we have a little secret. Jon and I like to practice the idea of quickly cleaning up the background of any shot before we take it. This doesn't mean sweeping and vacuuming or putting everything away on their proper shelf. We would miss the moment we wanted to capture if we did that. Let's call it the 10 Second Sweep. We do a quick scan of the scene, and if anything is distracting from what we want our focus to be on, we just move it away so that it's out of the shot. Literally, like to the side of the couch. Or to the opposite wall. It's fake cleaning. And it works like a charm. We do it all the time :) I'm all about being real, but if I'm taking a photo that I may potentially frame on my wall, or send off to grandparents, or if I just want to make myself feel better, it's worth a fake cleaning. 10 seconds. No big deal.


5. Look for catchlights

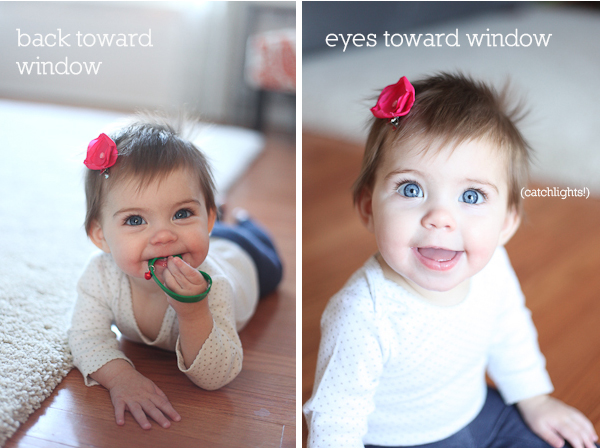
A catchlight is when indirect light fills your subjects eyes and lights them up. We're pretty hooked on them, they have an awesome way of bringing the eyes—and entire face—to life. To know if you’re getting a good catchlight, look for the source of light reflecting in your subject’s eyes, and notice how much the eyes light up compared to a direct light or backlit photo. We're secretly crazy about backlighting, but we've noticed most clients prefer a radiant face to a radiant halo of glowing hair at the top of their head. Weird, I know. That said, even as a lover of backlighting, when I'm shooting indoors I am a sucker for catchlights, and I'll always choose indirect light in the eyes over the hazy background and darker face you get with backlight. You can get awesome catchlights with indoor window light during the day by having your subject look toward the window. Try it...you'll fall in love with it.


BONUS

There are routine ways to make your camera let the maximum amount of light in, and each of these will require their own post at some point, but in the meantime, here are some numbers you should know to give you a starting point when you're hurting for light: You want to adjust your aperture first (make it as large as possible), your shutter speed second (no slower than 1/80th of a second to keep from blurring), and your ISO last (anything above 800 is usually too grainy and may have poor color quality). If you're still not getting enough light or you have a lot of blur, we'll need to start talking about getting a new lens. And we'll definitely be doing that sometime soon.

Let me know if you have any questions, I'm an open book!

What about you? Have you found anything that helps you with your indoor photos? Or any specific challenges?

If you have a question about lenses, you may want to read Lenses: What You Want to Know.
Pin It

1.31.2013

Melissa

Hi! I'm Melissa.

I count down to Friday every week.

In my home, ice cream is a food group (our very favorite one).

I'm addicted to new music and adding new songs to our music library. I got that from my better half.

I love the summer because I am seriously the coldest person on the planet (ask my husband) and I live for hot, summer days outside in the sun to thaw out from the rest of the year.

I am the most chronically indecisive person you will ever meet. Ever. It's ridiculous.

I dream big, but in the middle of my big dreams I get reminded that the people closest to me and the simple things in my life are my favorite dreams. And I am okay with that.

I am not a morning person, and I watch those amazing, productive morning people in awe. I don't have to ask how they do it, I already know. They leap out of bed while I hit snooze five times. What would it be like...

I think Christmas and fireflies and the beach are magical.

I cannot be brief—it's physically impossible. Believe me, I've tried. My English capstone professor also tried, thinking she could teach me brevity, and here I am, 6 years later, still more verbose in an email than anyone else I've ever met. It's the sad truth. But you will never lose any details with me!

I have a crazy photographic memory of conversations, events, and even what I was wearing when I said something, but I have to ask someone their name no less than three times before I remember it.

I crave authenticity, and adore others I find that in.

I can't stand not knowing what happens in a book, movie, article, or anything else with a storyline. I have to catch every part, hear every word, and get to the very end, even if it's not good. I will die of curiosity until I do. While everyone else was snoozing away at sleepovers, I was the one panicking wide awake at 2am when the VCR automatically shut off because someone put some awful timer on the movie, assuming we'd all be asleep. This is a terrible weakness, and it's exactly why I hardly watch any TV. I would have no self control to turn it off. Ever. 

I am a people person to the core. There are few things more satisfying to me than getting to know someone and hearing their story. My husband's friend has a phrase I love: "There are two kinds of people in the world. People I like, and people I don't know yet." I could live by that.

I love making things look pretty, love finding beauty in my home and outside of it, and love reminding others of the beauty in themselves. That is one of the biggest reasons I find photography such a fulfilling thing to do. I love bringing out the real beauty that is already there, and capturing it for all to see.

The most important things to me are God, my husband that is my perfect fit in every way, my three beautiful and absolutely off-the-wall children, and people.

My house is usually in need of some serious tidying, our dinners usually start much later than they should, and my to-do list is usually weeks old and still unfinished, but I'm totally on top of our taxes every year and we have dance parties at least every other day, so that's got to count for something.

I love connecting. I can't wait to connect with you.


Instagram: @ladysmith10
Pinterest: ladysmithshop
Blog: (the retired side biz)

Pin It
Pin It button on image hover