
by Julie


They say imitation is the finest form of flattery, and if that's the case, then Mini Boden should be super flattered. I love stores like Mini Boden. I have been eyeing these darling little glitter ballet flats since they came out. It’s just not realistic for me to spend forty bucks on a pair of glitter shoes. Let's be honest, the glitter always rubs off the toes after a couple of months anyway.
When I realized I could make them for under $10, I decided to go for it. This project can be done for pennies if you already have everything on hand. Just grab a pair of flats and get started. Your local thrift store would be a great place to find shoes. It doesn't matter if they are worn; you are going to cover them with glitter. I didn't have a pair to work with, so I headed over to my neighborhood Old Navy, where I found these silver gems on clearance for $5.49 (this was on Monday so run—don’t walk—to grab a pair). Honestly, I even thought of just keeping the shoes silver and adding the bias tape. Wouldn't that have been cute too?!
I wanted big glitter, not the micro-fine kind (although you could definitely use it). I went to Michaels where I found Martha Stewart Tinsel glitter on clearance for $1.50 (regularly five bucks, woot woot!). I was on a roll. Then I stopped at JoAnn for yellow bias tape. I bought double fold, but upon returning home realized the single fold stuff would look better and, luckily, I had some on hand so all was not lost. I recommend not going to three stores, but somehow that’s how it played out for me.
Let's get our glitter on!

Supply List
- ballet flats
- tacky glue
- glitter
- bias tape (I used single fold, not the double fold shown in the pic)
- foam brush
- painters tape or masking tape
- newspaper
- paper clips or binder clips
(whatever you have on hand)
If you start off with new shoes, I recommend scuffing them up a bit. You can use fine sandpaper, or just go the au natural route and let you kids wear them for a week. You don’t want to skip this part, otherwise the glue won't adhere as well. Also, mark off a quarter inch or so, so that you can attach the bias tape.

Next you want to tape off the sole of the shoe and stuff the inside with newspaper. This will keep them looking professional by keeping glitter from getting everywhere. Plus if you pack in a whole sheet of newspaper, you can use the paper as a handle, and keep you fingers clean.

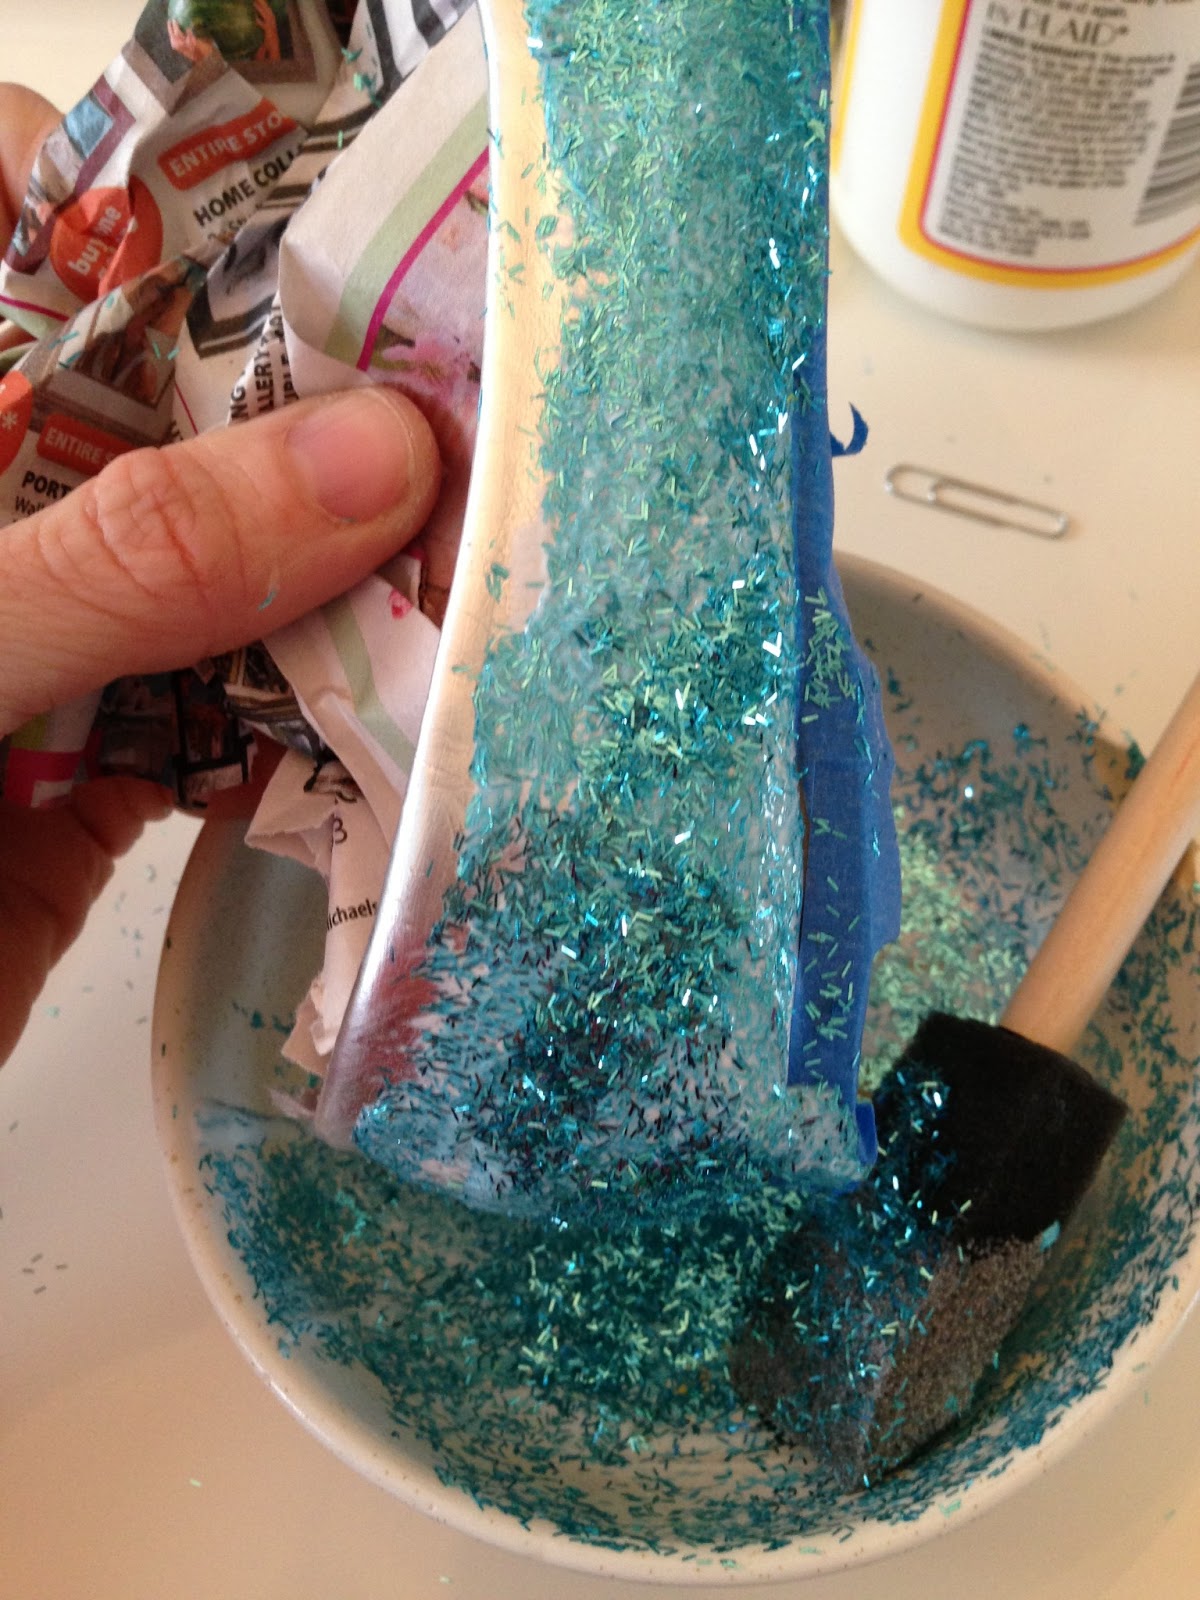
Now get a bowl and mix a little Mod Podge and glitter together. Just eyeball it, you really can't screw it up. You want to keep a gluey consistency so it glides on well.

Using a foam brush or paint brush (I am not sure it matters what you use), brush on your first coat of glitter glue. Do one shoe at a time, and by the time you are done with the second shoe the first should be ready for another coat.

Brush on a second layer of the glitter glue. Get yourself a treat while you're at it for doing such an awesome job!
Now you just sponge on some glue on the spots you have missed. I like to sprinkle dry glitter all over the shoe after the second coat to give it a little definition and really make it sparkle.
Check for empty spots and fill in where needed.
Let the shoes dry for a while, maybe overnight, or maybe while you watch an episode of Project Runway—it's your call.
Now take out your bias tape and measure around the shoe to get the length you need to cut. Remember to add a little extra to fold and overlap. Iron one side of the bias tape open.

Initially I wanted to sew the bias tape on, and then I realized this was a physical impossibility when it came to sewing the area close to the toe. I was crushed, I didn't just want to slap the puppy on there, it would have looked too crafty. Then I had a brilliant idea—sew down the folded side of the bias tape to make it appear to be sewn on to the shoe instead of glued. Seriously pleased with this sudden burst of thought, pat on my back! If you really wanted to you could faux sew the toe and then sew the rest of the bias tape to the shoe. Just make sure to use an needle meant for leather. But I opted to faux sew the whole thing.

Now you just take a little tacky glue and wipe it around the rim of the shoe on the inside and out, just do three or four inches at a time.

Just use your finger to spread that glue on there, or use a paintbrush, whatevs!

Now is the time to use those trusty binder clips and paperclips. Clip one on every few inches to make sure the bias tape stays in place. Let dry for the recommended time on the bottle, or half a KU basketball game, which is what I did.

Touch up any holes in the glitter and in the bias tape to make sure it is secure.
Congratulations! You just made a pair of glitter shoes with a fancy bias trim for eight bucks when they retail for $40 online (plus $10 in shipping). You are also encouraged to spray a sealant of some sort to keep it from all coming off. Use whatever you have on hand, just make sure its glossy. otherwise you will lose all that glittery goodness!

Think of the possibilities: you could make shoes to match all of your little girl's dresses. If you made her dress you could also make bias tape from the dress fabric and make a perfect match. Think of how cute these would be with striped or floral bias tape. Oh the possibilities!
In the interest of full disclosure, I am not sure how these will hold up. My daughter has to wear sneakers to school, so really she will only be wearing these to church. I will keep you updated with how they wear!
Stay tuned for another "make it your way" project coming soon.
And since this is my first posting I am thinking a giveaway is in order!
I will be sending one lucky reader everything (except the shoes) you need to make and trim your own pair of glitter shoes for your favorite little girl.

Giveaway Rules:
- Leave a comment
- One entry per person
- Open to those living in the U.S.
- Winner picked via random.org
- Giveaway ends 2/17/13 at 10pm est
Winner will be announced on Monday, February 18th.
May the odds be ever in your favor :)
And the winner is #29 Happy Homemaker And Momma who said: Thank you so much for this tutorial! These are sooo cute!
Featured on:
And the winner is #29 Happy Homemaker And Momma who said: Thank you so much for this tutorial! These are sooo cute!
Featured on:

I shared this project at:
Show and Tell Saturdays at Be Different Act Normal
Strut your Stuff Saturdays @ Six Sisters Stuff
House of Smiths
Craft-o-Maniac
Skip to my Lou
So you think you're crafty

I love Mini Boden too. And my daughter is crazy for all things glittery, sparkly, fancy, etc. She would LOVE these!
ReplyDeleteThanks for being my first comment! I hope to have more Mini Boden inspired projects in the future.
DeleteYou really are my hero! I love this and Olive will definitely be getting some glitter shoes when she gets older.
ReplyDeletePS - I have a huge Martha Stewart glitter collection. I hoard it as much as I hoard fabric.
Ahh thanks! Much Love! Thanks for the support! I might need to see your collection. I need more glitter projects in my life.
DeleteIt fills the top of my craftsman toolbox that Rudy bought me for Christmas (which you would love btw cause its pink). I'll take a picture tonight.
DeleteIt fills the top of my craftsman toolbox (which you would love btw, its pink). I'll take a picture and send it to you.
DeleteAwesome. These are great! My girls and I need matching pairs.
ReplyDeleteI am totally going to make a matching pair for myself, such a great idea!
DeleteAmazing, Julie!
ReplyDeleteWhy thank you Ms. LuAnn!
DeleteGreat tutorial! I will have to make some of these for my baby girl. Will be a perfect accessory for her upcoming birthday!
ReplyDeleteThank you! Let me know if you do, I would love to see pics! These would be a perfect birthday present, what girl doesn't love sparkles!
DeleteI am totally doing this for my daughter. She would love some sparkly flats. These are way cuter than the ones at Target too! Thanks for the awesome tutorial!
ReplyDeleteYour daughter would rock these flats! Be sure to check out Old Navy for shoes they are having a huge clearance right now! Thank you for the compliment, I was pretty pleased with how well they turned out and E LOVED them!
Deletejulie... these turned out so cute!! nice work girl!!
ReplyDeleteWe might need to make a pair for your little one!
DeleteSo darling!
ReplyDeleteThank you so much!
DeleteI am LOVING these and all the other colors! If I could enter, I would! Great work team!
ReplyDeletesuch a fun idea! Would love to win!
ReplyDeleteGood luck! Thanks for playing!
DeleteI would love to win!
ReplyDeleteI wonder if you did a top coat of modge podge over the glitter if it would help it hold up longer.
Hey Julie, fabulous name! I definitely recommend some sort of sealant and a light coat of mod podge would work, just make sure it's shiny and not matte otherwise you will lose all you glittery glow:)
DeleteThanks for stopping by!
Cute cute cute! Hoping the glitter doesn't rub off all over the house. I have a cheap glitter nailpolish that does that.
ReplyDeleteStore bought glitter shoes tend to flake as well, so far so good. I sealed them with a coat of poly so that should keep it in check. I will keep you posted. Thanks taking the time to comment!
DeleteSuch a fun tutorial and definitely better than the $40 version. Ouch!
ReplyDeleteI like to think so:) Thanks for stopping by!
DeleteI love me some glitter! So super cute Julie!
ReplyDeleteWhy thank you Miss Lindi!
DeleteI think Colton would love a pair of those. :-) They really did turn out super cute!
ReplyDeleteI will pay you to make him a pair, think work boots in brown glitter!
DeleteSo fun! I want to make a pair for myself! Hope I win!
ReplyDeleteI think I might have to make myself a pair as well! Thanks for stopping by!
Deleteyou are craft and amazing!
ReplyDeleteHey thanks lady!
DeleteIs it breaking the rules if I enter this giveaway? Awesome pictures by the way. You need to teach me :)
ReplyDeleteThanks for the compliment, but no you are not eligible to be in the contest! Where were you last night?
DeleteOk, the shoes are great, kickin...!
ReplyDeleteI forgot to say, the tutorial is great. Keep up with the good work, I'll be back for more.
DeleteYou always amaze me!
ReplyDeleteThis comment has been removed by the author.
DeleteI learned from the best! Thanks mom! Love you!
DeleteGreat idea!!
ReplyDeleteThat is UH-MA-ZING! I would like to try one myself in silver - my daughter would surely love it! Great job Julie! Thanks for sharing :-)
ReplyDeleteSeriously huge fan of yours! This is my first tutorial and I am so flattered you took the time to comment! Let me know if you make yourself a pair!
DeleteLove it....currently thinking about all the outfits in my daughters closet and how I could make these for all of them! Thanks for posting!
ReplyDeleteWouldn't it be great to have a pair in every color! Thanks for stopping by!
DeleteLove it!
ReplyDeleteThanks for stopping by!
DeleteLove these!!! Your post was so fun!
ReplyDeleteThanks for taking the time to comment!
DeleteFound you on craftgawker...Brilliant...we can't get enough of glitter shoes in our house ( not me obviuosly :-)...pinning and following your blog
ReplyDeleteThanks for stopping by and commenting! thanks for pinning and following!
DeleteJulie! Fantastic job! I think I need to do this for my nieces. I'm excited to see what you do next.
ReplyDeleteWhy thank you miss Krysta!
Deletelove the shoes - they are exactly the type my grand daughters are wearing so now they can have them in every color!!!!
ReplyDeleteI love the idea of making them in every color! I want to make a kelly green pair next time. Maybe for St. Patricks Day!
DeleteGreat Tut! I am sending this to my daughter-in-law she and my granddaughter will love this. They really are beautiful.
ReplyDeleteThank you so much for the compliment and for taking the time to comment!
DeleteVery cute! I'd want to make them for myself :)
ReplyDeleteYou totally can make a pair for yourself, I plan on making myself a pair!
DeleteThank you so much for this tutorial! These are sooo cute!
ReplyDeleteThank you for taking the time to comment and for stopping by!
DeleteCongrats! You won the giveaway on Monday, I left a comment on your blog, but still haven't heard from you. Please send me your address by tomorrow or I will have to select another winner.
DeleteHi I am so glad I found your blog today! I am sooo fallowing! I also refashion shoes! They are my favorite thing to refashion. I have never though of doing that amazing bias tape idea of yours... LOOOOVEEE IT! You are so clever. Anyway I am in love with your refashions, your blog and you(I am kinda sounding like a stalker).
ReplyDeleteI am Kasey from http://mylifeonthedivide.blogspot.com/ I hope you will check out my shoe refashions too.
Thanks for commenting I will definitely check out your blog!
DeleteToo cute! There isn't a Mini Boden here.
ReplyDeletethank you for stopping by and taking the time to comment!
DeleteI'm wishing I had kept the scuffed up glitter shoes my daughter already had. What a great way to repurpose! So creative. And I think they'd be great for moms too! :-) Btw, if this really was your first post, keep 'em coming, please!
ReplyDeleteYep its my first post, thanks for the vote of confidence. The Idea stemmed from always re-glittering the toes of her shoes. I agree Glitter shoes can be for everyone not just kids!
DeleteThose are so cute! I'd love to make them for the little girl I babysit for!
ReplyDeleteThis is fab! I am obsessed with Ruby slippers and haven't been able to get any for years now as my sisters used to get me a pair every year for christmas but that hasn't been the case for a while. Will deffo be doing this now!!! Might even need to do it tonight! *looks at shoes collection* :D xxxx
ReplyDeleteI love that your sisters bought you glitter shoes every year for Christmas! Your sisters sound awesome!Just make sure the shoes are really scuffed up first so the glue can adhere and make sure to seal them with a coat of poly!
DeleteHello:
ReplyDeleteI write from Spain and i want to say that this proyect is fantastis, very simple but relly nice
congratulation
You are my first international comment! thanks so much for taking the time to comment!
DeleteSo Cute! I am goimg to make some for my granddaughter.
ReplyDeleteglad you like it!
DeleteI don't know why glitter makes everything better, I just know that it does. These are adorable, Julie!
ReplyDeleteWise words
DeleteSo Cute. My daughter would love a pair!
ReplyDeleteYay! Now I have something to do with that pair of flats in my closet! This is so cute!
ReplyDeleteGlad you were inspired! I am just wishing I didn't just send two pairs of flats to the goodwill!
DeleteLove love love glitter! Thank you for a great tutorial (and the updates).
ReplyDeleteyou bet!
DeleteThis is great, inexpensive accessory to go with the outfits I like to make for my granddaughter.
ReplyDeleteJust buy a bunch of flats when they go on clearance and once you have the supplies they are super cheap to make! Just make sure to scuff them up really good so the glue adheres and to seal them with a good coat of poly!
DeleteMy granddaughter LOVES glitter shoe. She's already outgrown 3 pairs. For this price I can make her more than one coloor.
ReplyDeleteShe is lucky to have such a crafty grandma!
DeleteGah! These are ingenious. I love the ida of the pre-sewn bias tape. Thanks for the giveaway.
ReplyDeleteThanks! the sewing of the bias tape was an aha moment! When my daughter put them on today she exclaimed "I can't believed you sewed the trim on"! Fooled her;)
DeleteI love the tutorial. I am going to have to try it for my granddaughter and for me also. I love the glitter and fun shoes. :)
ReplyDeleteLet me know how it turns out! make sure to scuff them up with sandpaper so the glitter adheres! Thanks for your comment!
DeleteI love your tutorial. I will have to make these for my granddaughter and for myself as well. I love glittery, fun shoes, too. :)
ReplyDeleteGlitter shoes for everyone!
ReplyDeleteThese are great! I need to try this.
ReplyDeletethanks! let me know if you give it go!
DeleteThese are awesome! I'm 28 years old and I want to make some for myself. I just recently heard about mod podge from a couple of friends and made my first project with it which I will be posting on my blog (http://veryvic.blogspot.com/) later this week. I was in awe of how cool it was and what a neat effect it had on the projects it was used for. Can't wait to try more projects with it.
ReplyDeleteThanks for stopping by, I will have to check out your blog! Mod Podge is the best! You should totally make a pair for yourself, just make sure to scuff them up really good so the glitter adheres!
DeleteThanks Julie, for the straight forward tutorial. I’m getting married in July and will be making a pair of these for my dancing shoes! Also, I really appreciate seeing all of your replies. Thank you.
ReplyDeleteCongrats on the wedding! Make sure to really take the sandpaper to them and I recommend a trial run to see how the hold up for dancing! some of the glitter came off on the first wearing, because I didn't rough them up enough in some spots. luckily its an easy fix!
ReplyDeleteIt's Cinderella all grown-up, how wonderful! I love them, just love them!
ReplyDeleteBlogging on beauty + justice at Creatively Redeeming Her, www.creativelyredeemingher.blogspot.com
-Rachel
Oh' my goodness, I have seen re-vamped even glitter shoes re-vamped but these are the best shoe knock off EVAH!!! I love them. Check back on COM later today. Also, I just liked you on FB. Have a Fabulous Friday. Hugs, jen
ReplyDeleteThank you so much for featuring me in your roundup of 10 hands on simple crafts! I am so excited about it! You made my day!
DeleteJulie
I'm a bit too old (or just too conservative) for glittered shoes for myself, but I LOVE the idea of adding bias tape to a plain of boring flats. Thanks for the idea. Newest follower <3
ReplyDeleteI've been selling glitter shoes for little girls for some time now (mainly for weddings.)
ReplyDeleteI mix several colors and types of glitter to get the hues and sparkle I love. The shoes I begin with already have something close to glitter on them so they are already "roughed up."
A couple of things I do differently: for some reason I have always used the FABRIC MOD PODGE (who knows why!) and I DO NOT mix the Mod Podge with the glitter. I apply Mod Podge to the shoes and THEN pour the glitter on; let them dry; and add another coat. These babies sparkle so much they could "put your eye out!"
However, mixing the glitter with the Mod Podge would DEFINITELY be less messy and maybe I wouldn't clog my shower, sinks, etc. with tons of glitter! LOL
Just thought I'd share!